| Linux-Mandrake: |
| User Guide and |
| Reference Manual |
| |
| |
| January 2000 |
http://www.linux-mandrake.com |
|
Next : Adding and deleting user accounts
Previous : Using KDE
Up
(Back to the table of contents)
We are going to configure and use an Internet
connection using two tools: Kppp and LinuxConf.
Kppp can be found in the KDE menu under the
Internet submenu. The window for Kppp is shown in
figure 6.1.
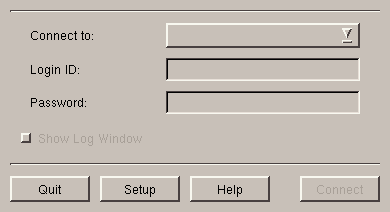 Figure 6.1 Kppp
Select Setup, you will then display the screen shown
figure 6.2.
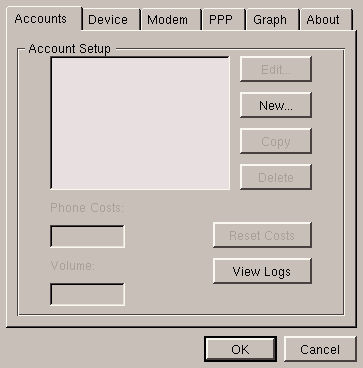 Figure 6.2 Kppp main window
Few things to be done here. If you wish, you can change the speed of the
serial port in the Device menu to 115200 and adjust the
options in the PPP heading to your preferences. To create an
account, choose New..., and you will see a window as in
figure 6.3.
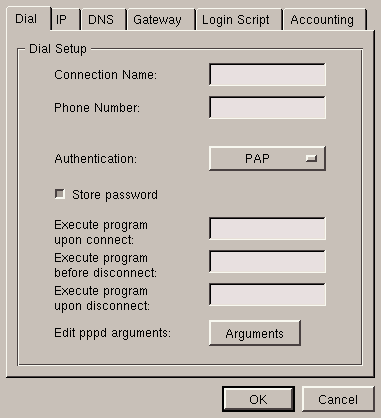 Figure 6.3 Create an account with Kppp
Section by section:
- Dial: enter the phone number of your Internet
provider. The connection name is random -- you can enter
whatever you like. You can also choose the programs to start before and
after disconnection (Netscape on connection, for example). Pay
attention to the choice of identification: most providers use PAP,
but others use CHAP, and -- more rarely -- a
script-based connection. Contact your ISP to obtain this information;
- IP: unless your ISP advises you otherwise, you should
leave the default option (Dynamic IP address) as it is. Since
the names given by the ISPs to the connections are usually rather
weird, you will want your machine to keep its name
:)
- DNS: the domain name is optional, you can ignore it.
However, you must enter the IP address (and not the name!) of your
provider's name server(s). The first entered is the first on the list,
and the servers will be queried in their order of appearance;
- Gateway: (unless you are told otherwise) leave the
default options as they are;
- Login script: leave this tab as it is;
- Accounting: if you want an estimate of the cost of your
call, enable the option Enable accounting. You will then have
to choose between the various invoicing methods given: for France, for
example, you will find France/Local.
And that's all! Then click on OK to validate, click on
OK a second time in the configuration panel and you will
return to the main screen.
From here, you will simply need to enter the user name and password for
your ISP account (not those of your user account!), then click on
Connect...
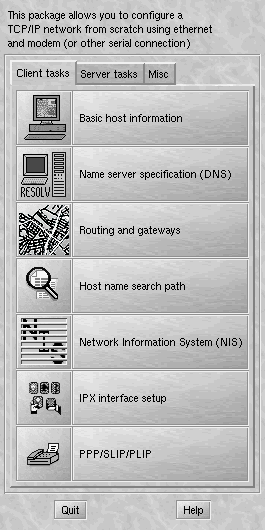 Figure 6.4 LinuxConf
Configuring an Internet connection with LinuxConf is a
little more complicated than with Kppp, but LinuxConf
has a much wider range than Kppp: you can use it to configure
almost all aspects of your system, and the aspect that we are interested
in here is the network. Be careful, you have to start it as
root. Tip: you are not obliged to log in as root to be
root. On a normal user terminal, type su. You will
be asked for your root password.
LinuxConf also has the advantage of functioning in text mode,
but here we will use graphical mode. You can launch LinuxConf
directly from a terminal and select the Networking heading or
type netconf directly. In either case, the same screen will
appear, and it is shown in figure 6.4.
Here are the various sections you will have to edit, in the right order,
and what you will have to do:
- Name server specification (DNS): disable the option
DNS is required for normal operation, specifying a default
domain is optional. You must then enter the addresses of your ISP's
name servers in the text boxes with the same name. You may specify one
or more search fields, but they are optional;
- PPP/SLIP/PLIP: you must configure the connection itself
in this tab. Click on Add, select PPP as the
interface type, then Customize and you will see the screen
displayed figure 6.5.
Section by section:
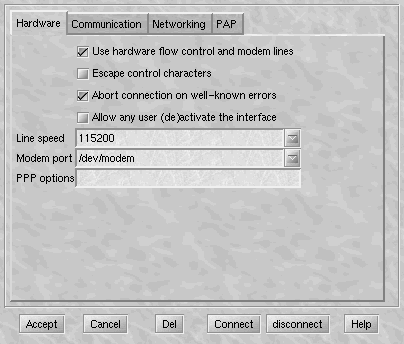 Figure 6.5 Hardware tab in LinuxConf
- Hardware: the only option to change here
is permission for any user to enable/disable the interface;
- Communication: you may leave the initialization chain
and modem call command fields as they are (resp.
ATZ and
ATDT). However, in the Chat section, delete all and
simply enter TIMEOUT and 5 respectively in the first
two boxes;
- Networking: enable, (if this has not already been done),
the Set default route option;
- PAP: reenter your user name in the Username
field and your password in Secret.
And that's it! To control the interfaces configured by this means, you
will have to use the program called usernetctl but this too
can be accessed via the K menu named: Personal/Linux
Mandrake/Networking/Usernet. It is fairly user-friendly -- you
simply have to click on the interface name to connect and disconnect.
Next : Adding and deleting user accounts
Previous : Using KDE
Up
Copyright � 2000 MandrakeSoft


